Thursday, February 28, 2019

How to Craft a Brand Manifesto [Guide + Examples]

In Simon Sinek’s famous Ted Talk “How great leaders inspire action”, he fleshes out a concept that some of the most inspiring leaders and organizations -- specifically Apple, Martin Luther King Jr., and the Wright Brothers -- leveraged to build loyal followings. It’s called Start With Why.

Start With Why suggests that if your brand truly wants to inspire an audience to follow you, your core message should focus on your organization’s purpose -- not how you make your product or what your product is. Spotlighting why people should care about your organization is how Apple, Martin Luther King Jr., and the Wright Brothers ultimately built a body of support for their causes, even though they all faced fierce competitors.

Simon Sinek’s notion that people buy the “why” behind your organization, not the “what” or “how”, isn’t some idealistic trend catching fire in the business world today. It’s actually rooted in human biology. To explain further, the most primal part of the brain is called the limbic system, and it controls all decision making. It also happens to control all of our emotions and feelings.

So, resonating with your audience will also appeal to the part of the brain that’s responsible for action. In other words, if you can evoke emotion, you can drive behavior. If you can’t do the former, though, you’ll struggle to build a loyal following, let alone sell them anything.

But how do you discover the “why” behind your organization? How do you actually connect with an audience and inspire them to follow you? One of the best places to start is by writing a brand manifesto.

5 of the Best Brand Manifesto Examples

1. Nike

Nike Brand Manifesto

Image Credit: Pinterest

Even though Nike endorses some of the biggest names in sports, like LeBron James, Cristiano Ronaldo, and Serena Williams, they never boast about how the best athletes in the world use their equipment. Instead, they stick to what has skyrocketed them to the top of the sports equipment industry -- emotional resonance.

Nike wants people to understand that success doesn’t mean becoming the greatest of all time. It means you did everything you could to become the best possible version of yourself. And that’s the “why” behind their brand -- to empower every athlete, regardless of their talent or ability, to reach their potential and achieve their own greatness.

2. Fiat

Fiat Brand Manifesto

Image Credit: Pinterest

Fiat isn’t just selling a sleek, Italian car. They’re selling a lifestyle. In their brand manifesto, you get a glimpse of the life they want to offer to their customers -- a life that they can live with burning passion and thrilling excitement.

However, Fiat doesn’t want its customers to live recklessly. They actually want them to treasure the little things in life just as much as the big things. So the “why” behind Fiat’s brand isn’t really changing their customers’ lifestyle -- it’s changing their attitude toward life. And that’s a compelling mission to have.

3. The North Face

The North Face Brand Manifesto

Image Credit: Pinterest

Most travel equipment brands focus on how their products can enable you to travel and explore your surroundings, which is engaging on the surface. But, in The North Face’s brand manifesto, they go another layer deeper by diving into why we explore.

By describing how exploring helps us understand ourselves better, The North Face’s purpose is crystal clear -- they not only want to help us explore more, but they also want to help us change for the better, lead more fulfilling lives, and cherish what we have.

4. Apple

Apple Brand Manifesto

Image Credit: Pinterest

For almost his entire career, Steve Jobs was considered crazy. His bitter disdain for the status quo compelled him to shatter conventional wisdom whenever he could, driving such a large wedge between him and his colleagues that they forced him out of the company he founded.

Despite all his controversy, though, Steve Jobs’ ability to think differently was what fueled Apple’s innovation and transformed it into the most valuable brand in the world. Steve Jobs’ story is the driving force behind Apple’s purpose. If they can inspire people to think differently and challenge the status quo, then they can help propel society forward and change the world -- just like Steve Jobs did.

5. Levi’s

Levi's Brand Manifesto

Image Credit: Pinterest

No one wants to coast through life. But, a lot of times, we drift away -- and we don’t even notice it happening. To help catch yourself settling in life before it’s too late, Levi’s crafted a brand manifesto overflowing with so much purpose that it could convince Eeoyre from Winnie-the-Pooh to go make his mark on the world.

By asking their audience whether they’ve made the world any better and telling them that all they need is their gut instinct and the clothes on their back to make that impact, Levi's conveys a brand purpose almost everyone would passionately follow for the rest of their lives -- don’t ever settle.

1. Identify your organization’s "why”.

Your brand’s purpose drives your entire brand manifesto. Without presenting a clear and convincing purpose, your manifesto will seem like an inauthentic, emotionally manipulative sales pitch. Your audience wants to know why they should care about you -- and your product’s “best-in-class” features has never been a compelling enough reason to support a business.

To uncover your organization’s "why”, consider asking your founders why they started the company. What problem were they trying to solve? Why did it bug them so much? And why do they want to keep growing the company? You’ll most likely find your organization’s purpose within those answers.

2. Write in second- or third-person to place your audience into the story you’re telling.

In each of the brand manifestos above, you’ll notice that the copy pulls you in by including the words "we” or "people”. That’s because Nike, Fiat, and The North Face all know that their audience primarily cares about how the brands can help them, so using pronouns like "you”, "we", and "them” (when referring to their own customer base) can engage people on a personal level and place them in the narrative the brands are crafting.

3. Describe how your brand’s purpose will improve people’s lives.

Most people aspire to transcend their current identity and lives. Self-actualization is a universal goal that almost everyone wants to achieve. And the smartest brand marketers understand this about the human condition.

For instance, did you notice how each of the brand manifestos above is essentially a life mantra that can improve your life? Nike -- define and meet your own greatness. Fiat -- enjoy life to the fullest. The North Face -- never stop exploring. Apple -- think differently and challenge the status quo. Levi’s -- don't ever settle in life.

By describing each brand's purpose in a such genuinely selfless fashion, each company's brand manifesto can prompt their audience to imagine a future with their product or service bettering their lives.

Start With Why

Your brand’s purpose is one of the most challenging things to pinpoint and communicate. But if you want to craft a compelling brand manifesto that will engage an audience and persuade them to support your brand, you must be able to clearly convey the reason you exist and why anyone should care. Only then will you be able to build the loyal following that every brand craves.

http://bit.ly/2NzPQ7u

Wednesday, February 27, 2019

How to Find your Dream Job in 2019

I remember sitting in one of my career classes in college listening to my professor tell the class how long it can take to find a job.

“Sometimes you’re completely qualified for the positions in which you’re applying for, yet it can take several months to find the right position,” he said.

My professor wasn’t kidding. I started applying for my first job six months prior to graduation, and it took me all six months to find one I was excited about accepting. Then, when I began the search for my second job, it took me closer to nine months from the moment I decided it was time to start searching for new roles to the call I received with the job offer I accepted.

Long story short — searching for a new job isn’t always an easy process. It has the potential to become stressful, time-consuming, and frustrating. But no fear! We’ve created this guide to help you through the process and make it a bit less intimidating. We’ll review the first 10 things you should do when you begin your search, where you can find job listings of interest, how to prepare for an interview, and the ways in which you can accept a job offer.

Let’s dive right in.

Depending on your specific situation, you may not need to walk through each of the following steps. This list is here to simply guide you through the beginning stages of your job hunt, so feel free to modify it as needed.

1. Consider your personality.

Your personality tells you a lot about yourself — what you enjoy doing, what makes you happy, how you like to communicate, and even the types of jobs you’d likely be really great at. There are a number of ways to incorporate your personality traits and characteristics in your job search. You can take one of the many online personality tests to learn more about your specific traits and discover various types of work and tasks you’d be a good fit for. This information is also helpful when thinking about the type of work environment you’d be most productive in. 

Your personality will help you narrow your search in other ways too — for example, if your results come back with details about you being more shy, introspective, and reserved, you can research ideal jobs for introverts.

2. Think about your skill set.

Your skill set is a list of your abilities — such as communication, decision making, and ability to work under pressure. These are often listed on your resume, so they’re important to consider for that reason as well as to help you determine the type of role you’d be successful in. You can learn more about your skill set and how it plays a part in the type of career you’d be an ideal fit for by taking a career aptitude test.

3. Reflect on your background.

Your previous work experience and education, or your background, are also great ways to determine a career path you’d be suited for.

For example, I studied journalism in college and worked at a news station after graduation, yet wanted to leave the TV industry. My background, which was tailored towards writing jobs and content-heavy positions, made me an ideal candidate for a blog writer position at HubSpot.

If your background doesn’t align with your newfound career interests that’s alright too! This may require a little more research on your end about whether or not you’ll need to go back to school for a masters degree, get a certification of some kind, or work in an entry-level position in your new field of interest.

4. Brainstorm your career goals.

Brainstorm your personal and career goals to help you determine the right job for you. Think about things like work-life balance, salary, and what you can envision yourself doing in 5-10 years. This will help you narrow down your search as different industries and positions have a range of standards when it comes to factors such as career flexibility and growth.

5. Create a list of your dream companies.

Whether or not you’re sure about the actual position you’re looking to get into, you should create a list of your dream companies to work for. This is a great way to keep track of the companies you’re most interested in, remain goal-oriented, and remember to continually check their job listings to ensure you’re not missing the perfect opening. You can then tailor your cover letter and skill set on your resume to fit these target companies’ candidate requirements and expectations.

6. Consider companies similar to your dream companies.

Be sure to consider companies comparable to your ideal companies as well. For example, if you’re hoping to work for a major company like Nike, you might also consider a smaller but quickly growing company in the same industry such as NOBULL. By being open-minded and realistic about how you’re going to reach your end-goal, you avoid locking yourself into one, narrow career path option.

7. Network professionally.

Whether you’re looking to stay in your current industry or pave a completely new path in another, professional networking is critical. These days, over 70% of job offers at companies, or at least get interviews, as a result of networking. Networking can help you get your foot in the door at a company of interest, gain a new and valuable reference, and determine whether or not you really want to move into a specific type of role.

8. Clean up your social media accounts.

These days, recruiting managers, hiring teams, and other people at the companies you’re applying to will often look you up on social media as part of their candidate search and screening processes. This means you should either make sure all of your social media accounts are not public, or remove every picture, video, or comment that may lead a potential company to believe you’re not mature or professional enough to join the team. The last thing you want a hiring manager at your dream company to do is take you off their list of potential candidates because of something on your Instagram or Facebook profile.

9. Update your LinkedIn profile.

Did you know there are over 6.1 million users on LinkedIn? That includes people like yourself looking for new jobs, people who are content in their current jobs, and people who are looking to recruit for and fill various openings at their companies.

That’s why ensuring your LinkedIn profile is up-to-date when you begin your job search is critical. Be sure to describe in detail all of your relevant, past work experience including promotions and notable mentions, as well as your education, awards, certifications, and anything else you feel is worth sharing. Make your profile look even more professional by accepting and initiating connections with people you know so you’re more likely to receive endorsements for your skills, experiences, and traits.

Recruiters, hiring managers, and employers who find you on LinkedIn will see you as a competent, impressive, and qualified candidate who’s taking the hiring process seriously.

Learn how to use LinkedIn for professional networking, business, and marketing.

10. Prepare your resume.

You must prepare your resume at the beginning of your job search for the same reason you need to update your LinkedIn profile — to ensure all of your latest and most relevant experience is available to recruiters and hiring managers so they can determine whether or not you’d be a good fit for the role you’re applying for.

Without a strong and updated resume, the companies you apply to won’t have any reason to take you seriously. Pay attention to the small details, such as your resume font and the skill set you choose to share. After all, this is how you’re going to make an impactful first impression.

(When in doubt, you can always update your resume using a template to ensure a professional look and feel that will blow hiring managers away.)

How to Find and Apply For Your New Job

Now that we’ve reviewed which steps to take in the first stages of your job search, you might be wondering how to find a job you want to apply for and make yourself stand out as a candidate. We’ve created this collection of tips and tricks involving job search sites, cover letters, and interview prep to help you do just that.

Job Search Sites

Today, job search sites — also known as job search engines —are one of the most common ways to find a new job. These sites provide you with valuable information on companies, location, industry, salary, qualifications, company reviews, and more.

Other benefits to using a job search site are the ability to upload your resume and cover letter for quick and easy application submission and the option to be alerted when a new job listing is posted based on criteria you provide. 

There are a number of popular job search sites that are used by millions of people around the world — so which ones should you use? Below we list six of the most common options.

  1. Indeed provides you with access to new job listings, company reviews, and accurate salary information. The site also allows you to post your resume so recruiters and employers can easily reach out you.
  2. CareerBuilder gives you the opportunity to search for a new job based on specific criteria, including your experience, location, or skill set. You upload your resume so employers can recruit you and the site will also review your profile and recommend jobs to help you find the right match.
  3. Monster allows you to upload your resume for a free assessment to ensure everything looks perfect. The site has a variety of other resources like opportunities to receive professional advice and interview tips, as well as to access to the latest (and most popular) job listings, salary information, and company reviews.
  4. LinkedIn isn’t just a networking site — it’s also a job search site. The site will take you through a series of steps to help you begin your job hunt. You can then view position openings and employers can read your resume (as well as easily view your LinkedIn profile). LinkedIn also allows you to search for jobs according to your specific career interests to narrow down your options.
  5. Craigslist is a very straightforward and simplistic job search site. Employers post their latest job listings and you can search through them by location and/or one of the site’s 20+ industry types.
  6. Glassdoor gives you access to the latest job listings, employee reviews, interview tips, and salary information. You can post your resume for hiring managers to contact you and the site also has a feature to view the types of interview questions specific companies tend to ask so you can prepare to the best of your ability.

Once you’ve determined which job search sites you want to use, it’s time to begin preparing your cover letters to send along with your resume to your prospective employers.

Unique Cover Letters

In a job application, your cover letter accompanies your resume and persuades an employer to interview you. It should describe the reasons why you’d be a great fit for the position you’re applying for — and when paired with your resume, the employer should clearly understand what makes you qualified for the opening.

Save time and use templates to create the perfect cover letter.

Not all companies require cover letters. Some make cover letters optional and some choose not to accept them at all. If cover letters are optional for the positions you’re applying for, sending one in is really up to your discretion as there are a range of opinions about their importance. However, if you’re required or choose to include a cover letter, you’ll want to make sure it’s concise, well-written, and stands out against those of your competition. 

Discover everything you need to know about crafting the perfect cover letter.

Interview Preparation

Needless to say, nailing your interview is critical if you want to receive a job offer. Although interviews are often high-pressure experiences for job-seekers, thoroughly preparing for them is a great way to relieve some of the stress.

Here are some commonly asked interview questions you can review and think about in preparation for your next interview. You can click the links to learn how to answer these common questions.

You can also use other resources for prep like Glassdoor’s past-interview-question feature, blogs about the job search process in your industry of interest — like this guide about marketing jobs — or ask the people you network with about their past interview experiences.

Accept A Job Offer

The last aspect of the job search process is the most exciting — accepting an offer!

Once you receive a job offer, be sure to get all of the important position details regarding salary, benefits, expected start date, and anything else you’re looking for clarity on. Remember, it’s normal — and expected — to ask for some time to think about the offer so you can review it before officially accepting. The hiring manager may give you a day, two days, or even a full work week to do this if you ask.

Don’t be afraid to decline the offer if the job isn’t the right fit for you. Other offers will come around — be patient and wait for the one that makes you excited. Also, you may choose to negotiate the salary upon receiving your offer. There are professional and realistic ways to negotiate a salary you’ll want to follow to ensure this process goes smoothly.

Lastly, you’ll need to give your current employer your two weeks’ notice to let them know you’ll be leaving the company so they can begin preparing to find a replacement or make any other necessary adjustments to your team and/ or department.

Learn about how you can prepare for your new job once you’ve accepted an offer.

Start Your Search

Beginning the job search process can be an overwhelming one. But following this guide and thoughtfully determining the exact type of role and company you’re looking for is a great way to make it less daunting. Remember to use job search sites to your advantage and prepare for your interviews so you’re ready to impress anyone you meet — get started searching for your next position today.

http://bit.ly/2IB1ujM

How We Grew Our Organic Reach 185% on Facebook

In 2018, Facebook enacted some algorithm changes that negatively impacted a brand's ability to reach its audience organically.

HubSpot's Latin America & Iberia Marketing team were no exception to this.

Despite having half a million Spanish-speaking fans on our Facebook page, we realized we were barely able to reach one percent of them -- which is pretty shocking, if you think about it.

That meant, despite years of work building up our Facebook audience on the platform, that we weren't even able to communicate with our fans when we had something interesting to say.

Unless, of course, we paid.

Make sense of the Facebook Business Page Timeline using this free guide.

But, from our perspective, paying to talk to people who already know about HubSpot, and presumably already like us, didn't sound the right thing to do. It also didn't seem to align with our goal of creating sustainable, genuine connections with our audience.

After months of suffering a down-trend on our Facebook numbers, and finding out about an increasing number of Facebook updates, we reached a turning point when we realized we needed to change our social strategy -- and, more fundamentally, the way we thought about Facebook.

Here, we're going to explain the six fundamental changes we made to our Spanish-speaking Facebook strategy to increase our organic reach over two and a half times.

How To Increase Organic Reach Despite Facebook's Algorithm Changes

1. Think of Facebook as a publishing platform.

Traffic was one of the main metrics we used to measure our Facebook performance in the past. As many brands do, we saw Facebook as a portal to our website -- a channel to obtain traffic.

In fact, Facebook has traditionally be one of the most important sources of traffic for many businesses … so it would be foolish not to tap into it, right?

Unfortunately, that was the case for the old Facebook. In the last couple of years, however, Facebook has carried out many updates for the same underlying goal -- to keep users on Facebook longer, and increase engagement on the platform itself. As a consequence, external links are not held in very high regard.

Now, brands that only use Facebook as an amplifying channel for their websites, or blog, are going to suffer the most from the algorithm changes.

We were part of that group.

Once we realized our old strategy wouldn't work on the new Facebook, we knew we needed a mindset change -- something many brands are likely unwilling to do.

To succeed on Facebook, we began thinking of Facebook as a publishing channel. This fundamentally meant creating quality content to be consumed directly on Facebook -- no links.

Okay, I know what you are thinking now: What happens with my traffic then? How do I convert all those people?

This is what scares most people -- you don't. You grow your brand awareness, and grow your reach. People may not be on your website, but they are still seeing your content and your brand, so when they are ready to buy or need something from you, they will remember you. You will be top of mind.

And magic will happen.

2. Play by Facebook rules (engagement, engagement, engagement).

Facebook's algorithm favors certain types of content. And those algorithm-favored pieces of content are put in front of more people -- and, as a result, get more engagement.

Of course, those favored content types are constantly evolving at Facebook, as the company continues to try to improve the engagement of its users. So it's critical you remain flexible and willing to experiment with content types as you enact your own Facebook strategy.

For us, videos have been our best bet over the past year, and have worked wonders for us -- once we recognized the power of video, we moved from less than 10% video content to 50% video content, which consistently gets higher reach than any other type of content.

3. Break up with paid boosting.

Along with the change to our organic strategy, we also changed the way we approach boosting posts on Facebook.

We came to the conclusion that boosting is not a sustainable strategy to get people's attention on Facebook. We slowed down our spending to focus on organic-only, and to understand which type of posts work for us -- and which didn't.

Once we started to see improvements in our organic reach and were happy with our overall strategy, we started investing again on boosting posts but, unlike in the past, we now only boost high-performing posts to generate extra engagement and reach, not clicks.

This approach reinforces our overall strategy and allows us to spread our net wider when it comes to brand awareness.

Additionally, it's important to note we keep our paid social strategy completely separate from our organic strategy, since those teams have varying tasks and goals.

4. Change the way you measure success.

A year ago, we used number of likes as our main growth indicator for social -- now, we see that number is meaningless.

Measuring the number of likes a post gets is no longer a good metric to determine the success of your Facebook strategy. There is no point in having 500K fans if your posts are being seen only by 5K. I'd rather have 100K fans, and have most of them see my posts regularly -- wouldn't you?

As a consequence, we came to the conclusion that we should move away from likes, and instead adopt a reach metric to measure our performance.

Of course, total reach can be easily manipulated by playing with frequency -- but a metric like Average Reach per Post is something we felt could help us most accurately measure our performance, and how many people are exposed to our brand regularly.

5. Keep it organized.

Giving some structure to your social posting might sound like a basic tip, but it really gave us the consistency and focus we needed for Facebook.

We implemented a detailed social calendar and divided the posts by categories, allowing us to be more effective when creating content. It also enabled us to work better as a team. For instance, we allocate some weekly slots to areas of the business we want to surface, such as the Flywheel or Academy, and created social content with that in mind.

This structure also helps us to better analyze which posts perform best, and adapt our social calendar on an ongoing basis.

6. Consider alternatives.

Not everything works as planned. We have tested some ideas that have failed -- alternatively, good-performing ideas have lost momentum.

#MartesEnVivo, a weekly Facebook Live broadcasting series, was our Tom Brady for months. Every week, it would be our top-performing post, driving up engagement and reach numbers.

But nothing lasts forever. When introducing more and more video content as part of our social content, we noticed that #MartesEnVivo was losing momentum, and the performance was not good enough for all the effort we were putting into it.

However, the content we shared in #MartesEnVivo was unquestionably valuable for our users, so we recently decided to spin the series and relaunch it on YouTube with a different name and different format.

The plan with this is to take advantage of YouTube search nature to make the lifespan of these videos longer -- and, also, to free up some precious slots on Facebook for ephemeral videos that perform better there.

This will happen to you as well, so it's always a good idea to keep in mind that Facebook is not the only social network that businesses can use.

There is always a channel for good content.

Our Results

The results have been surprising, even for us. We knew this was the right approach, but we never anticipated such a big improvement in our metrics in only five months.

Ultimately, we saw an average 185% increase per post. We also saw a significant increase in all the metrics related to video-viewing on Facebook.

Over the next year, we are going to strive to push these numbers even further by continuing with this strategy, and trying new formats that can give us an extra push.

hubspot-facebook-organic

Facebook Stories, for instance, is receiving a lot of attention from the Facebook community -- so it's definitely something on our radar.

Ultimately, Facebook's algorithm changes can be scary and frustrating for your company, but it can also serve as a major opportunity for new growth. By changing your Facebook strategy to respond to Facebook's changes, you just might find new avenues to reach, and impact, an even larger audience.

download our free facebook business page tips

http://bit.ly/2Xtp5pV

How to Run LinkedIn Ad Campaigns: A Beginner's Guide

LinkedIn is a highly valuable tool to network with like-minded professionals. But here's something we don't talk about as much as we should: LinkedIn is also a highly useful inbound marketing platform.

It might seem a little bit intimidating. You have enough on your plate … do you really need to figure out another way to create targeted content? Actually, yes. You have more power at your disposal with LinkedIn than you might realize.

That's because LinkedIn has a powerful ads platform. If you're already using pay-per-click (PPC) techniques to power your presence on Facebook, Twitter, or Google, consider yourself lucky — you can add LinkedIn to that list, too.

Download our free two-week planner on running LinkedIn Sponsored Content campaigns.

But if you're new to LinkedIn ads, fear not — we've put together a step-by-step guide to setting up your first LinkedIn ad campaign. Bookmark this post and refer to it when you're ready to get started.

How LinkedIn Ad Campaigns Work

Advertising on LinkedIn is a two-step process: first, setting up your LinkedIn campaign and then, creating your ad(s). In this section, we walk through how to set up a campaign and build your ad(s) — plus some best practices and tips for each.

Step One: Setting Up Your Campaign

Your LinkedIn advertising campaigns will live on a platform separate from the LinkedIn you see every day — the LinkedIn Marketing Solutions platform. Visit this page to get started with your campaign, and select "Create Ad."

linkedin-advertising-campaigns-1
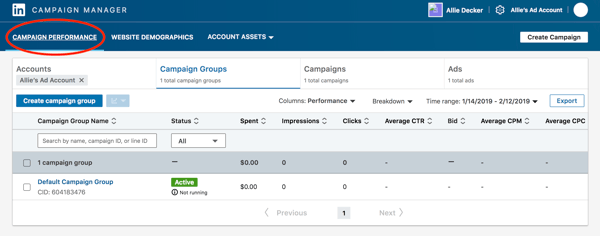
From there, you'll be prompted to create a LinkedIn Campaign Manager account (if you haven’t yet). Make sure you enter your associated LinkedIn Company Page if you have one.
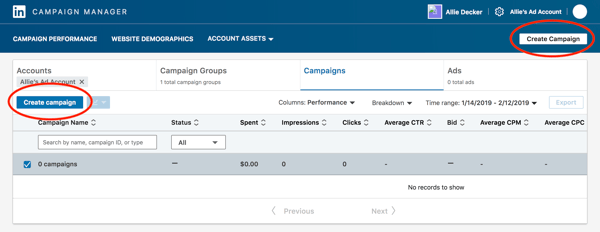
Next, you’ll be taken to your member dashboard. If you haven’t entered your billing information, you’ll need to do so to unlock your account. (Don't worry — you won't be charged until your campaign is live, and from there, you'll be charged periodically for ad clicks and other engagements.)

On your dashboard — or "Campaign Manager," as it's formally called — you'll see a call-to-action (CTA) to “Create campaign.” Click that button, and you'll be redirected to a page where you can start setting up your campaign.

linkedin-advertising-campaigns-4

Note: As of February 2019, LinkedIn introduced a “new objective-based campaign creation experience”. We’ll be covering that new process in this article — to learn more, check out this page.

linkedin-advertising-campaigns-5

First, indicate a Campaign Group and name your campaign. Campaign Groups help you organize your campaign. You can leave the Default Campaign Group as-is, or create a new Group.

As for the campaign name, these are only visible internally, so we recommend you choose a highly informative name — especially if you have a few different folks working on the campaign.

For example, if I was doing a test to determine the best type of demographic targeting, I might use the title, "Unicorn Food Ad Test — North America, 18 to 24, Female." That name describes exactly who I'm targeting, without having to view its details. Compare this to something like "Unicorn Food Test 1," which doesn't indicate anything about who the ad is targeting.

Once you choose your Campaign Group and name, you can start setting up your campaign.

1. Objective Selection

First, choose your campaign objective. Your objective is what you want people to do when they see your ads. According to LinkedIn, choosing an objective helps them “customize your campaign creation, deliver the best ROI for your stated goal, and show you relevant reporting.”

There are three overarching campaign themes: Awareness, Consideration, and Conversions. Under those themes, the available campaign objectives are:

  • Website visits will drive traffic to your website and landing pages. According to LinkedIn, this type of campaign will also boost brand awareness (at least while that objective option remains unavailable).
  • Engagement will increase engagement on your content and boost followers on your LinkedIn Company Page.
  • Video views will increase exposure of your videos to people who are likely to engage with them.
  • Lead generation will show a LinkedIn lead generation form with pre-filled LinkedIn profile data to those LinkedIn users most likely to engage with the form.

Note: LinkedIn is still releasing a handful of features as part of their new campaign creation experience, including a handful of objective options. Check back for some exciting updates!

2. Audience

Next, choose the parameters of your target audience. Targeting who sees your ad can help it fulfill its campaign objective — the more specific and relevant it is to your audience, the better it’ll perform. LinkedIn allows you to target according to a few different categories, which we've outlined below.

You don't have to use all of these options, but the more specific your targeting criteria, the more relevant it's likely to be to the audience you select — and, therefore, the more likely you are to have a better ROI.

First, answer a few basic questions, like the language in which you'd like your ad to appear. It can be written in any of the 20 languages LinkedIn supports, including Spanish, French, and German.

You must also select at least one location for your ads. Depending on your business, more specific targeting may be helpful. You can select a location as broad as North America, or as specific as the San Francisco Bay Area. Consider excluding any nearby locations from your campaign so your budget isn’t wasted on locations where your ad isn’t relevant.

Next, click “+ Add new targeting criteria.”

linkedin-advertising-campaigns-15

Company

If your target audience has a certain employer, you can target it directly — even by name. You don't need to have specific names in mind, though; LinkedIn allows you to also target companies based on the industry (like Legal, Non-Profit, or Finance) and company size.

Demographics

If your audience is heavily skewed toward one gender and/or age group, target your ad toward them.

Education

If you are looking to target people who have a particular educational background, you can target your ads based on schools. For example, perhaps you're trying to target a certain alumni association — you can reach out to it through a LinkedIn ad. You can also customize the targeting according to the field of study and degree.

Job Experience

If your product or service is best for CFOs, targeting only people with "CFO" in their titles will increase your conversions, and, ultimately, save you money. You can choose specific job titles or choose from job functions, seniority, and years of experience. From the CEO of manufacturing companies to the entry-level associates at an accounting firm, you can target a specific group of people for your ads.

Your target audience may also have a certain skill set, such as email marketing, financial planning, or risk management. Think about what your target audience does well or where it aspires to excel. Then, use the ad to target people with similar capabilities.

Interests

One of LinkedIn's best attributes is the ability to join groups with like-minded professionals in which you can discuss industry trends and topics. If your audience is very vocal on a topic, or you're trying to gain thought leadership in a certain area, this type of targeting might be a good option for you.

Once you establish your ad targeting criteria, you can save it as a template for future campaigns. You can also enable LinkedIn to expand your audience to include people similar to your target audience.

linkedin-advertising-campaigns-9

3. Ad Format

Next, choose your ad format. There eight different types of LinkedIn ads you can create as part of your campaign.

  • Text ads show up on the right column or top of the page on LinkedIn. They feature text only.
  • Single image ads feature one image and show up on the LinkedIn newsfeed along organic content.
  • Carousel ads feature two or more images and show up on the LinkedIn newsfeed along organic content.
  • Video ads feature one video and show up on the LinkedIn newsfeed along organic content.
  • Follower ads promote your LinkedIn Company Page and use LinkedIn profile data to personalize each ad. They’re only visible on the LinkedIn desktop platform.
  • Spotlight ads promote a special offering and use LinkedIn profile data to personalize each ad. They’re only visible on the LinkedIn desktop platform.
  • Job ads promote open jobs and use LinkedIn profile data to personalize each ad. They’re only visible on the LinkedIn desktop platform.
  • Message ads are delivered to your target audience’s LinkedIn inbox.

When you toggle between the ad types, you’ll see that the Forecasted Results box on the right-hand side will change. This feature analyzes your campaign parameters (bid, budget, targeting, start/end dates, etc.) and takes into account similar campaigns and advertisers. It also simulates the ad auction to generate the numbers displayed.

Keep an eye on this box as you choose your LinkedIn ad type. If you're first starting out, deciding what ad type to choose might come down to your budget. Outline your priorities, and then you can decide which type works best for you.

Additionally, some ad types require you to link your LinkedIn Company Page, and some tap into LinkedIn translation services.

4. Placement

Next, decide whether you want your ad to be displayed on the LinkedIn Audience Network, which gives your campaign more reach and exposure among LinkedIn’s third-party platforms and sites. Note: This option isn’t available for every ad type.

You can also choose to exclude or block certain categories, applications, and sites in the Network if you so choose.

linkedin-advertising-campaigns-11

5. Budget & Schedule

Next, set up the budget, scheduling, and bidding options that work best for you.

Budget

Set a daily budget for what works best for your company's marketing spending. Before investing a lot into one campaign, test and measure the success of each campaign and ad variation. You don't want to put thousands of dollars, for example, into an ad that doesn't resonate with your target audience.

Let's say you're the VP of Marketing at a high-end floral company. You assume that most of your target market is made up of soon-to-be brides, so you direct your LinkedIn ads to bridal groups. But after spending thousands of dollars, you only generate 10% of the leads you were hoping for. Your subsequent research shows this was the wrong move, and you later learn that people near your store who are on LinkedIn are actually looking for flowers for corporate events. It would have been nice to know that before spending a large amount of your budget on LinkedIn ads, right?

That said, because of its extensive targeting opportunities, LinkedIn ads can successfully target niche markets. But the cautionary experimentation is crucial to do early on — if you observe a campaign performing well, then you can put a larger budget toward it.

Schedule

Choose a date for your campaign to start. You can indicate for your campaign to be shown continuously or ‘til an end date.

Bid Type

In this section, the three options you have are:

  • Automated bid, which allows LinkedIn to determine what amount will maximize your campaign objective and whatever option you choose (Clicks, Impressions, or Conversions).
  • Maximum cost-per-click (CPC) bid, where you'll be charged each time someone clicks on your ad. LinkedIn will suggest a bid range depending on your budget and the competition for your ads — the more advertisers bidding on a similar campaign, the higher your bid will need to be. This bid is the maximum you will be charged. If the current rate is lower than your max bid, you will only be charged the current rate.
  • Maximum pay-per-1,000 Impressions (CPM) bid, where you’ll be charged a certain amount each time your ad is viewed by every 1,000 people on LinkedIn. This option is unavailable if you’re using the LinkedIn Audience Network option.

Deciding on the best maximum bid can be tricky. When deciding between CPC and CPM, think about your end goal. Are you trying to get as many people as possible to see your ad to help with something like a branding campaign? If so, CPM might be your best option.

On the other hand, if you want more people to click on your ads to drive traffic to your website or generate new leads, CPC might be better for you.

As for your optimal maximum bid, some trial and error might be necessary. LinkedIn will give you a suggested bid, which is a good place to start. Then, think about when your audience is most likely online. You'll want to bid higher during that particular time to be sure that your ads are the ones being seen. And make sure LinkedIn is actually the best place to reach them, too — different populations use different types of social media. Play around with your bids and see when you get the most return for your dollars spent.

6. Conversion Tracking

Lastly, you have the option to set up conversion tracking for your LinkedIn campaign, which will track and measure the actions people take after clicking on your ads.

Conversion tracking is an optional part of setting up your LinkedIn advertising campaign but is highly valuable for your business.

If you choose to set up conversion tracking, click “+ Add conversions.” A new window will pop up, where you’ll name your conversion, choose your conversion settings, and decide how you’ll track the conversions. Note: The information on the right-hand side of the window is super helpful — it’ll answer any questions you have and walk you through the process.

linkedin-advertising-campaigns-16

For more help on implementing and managing your LinkedIn Conversions, visit their help page here.

Bravo! You’ll officially set up your LinkedIn advertising campaign … but you’re not done yet. When you’re ready to move on, click “Save.” Beware: Your objective and ad format cannot be changed once you save, so be sure about your choices before moving forward.

Step Two: Setting Up Your Ad(s)

This section corresponds to what type of LinkedIn ad you chose for your campaign. Once you establish the basic parameters for your ad in step one, you'll be prompted to start building it and choose how LinkedIn will display and rotate your ad variations — if you create more than one.

To get started, click “Create new ad.”

linkedin-advertising-campaigns-12

A screen will pop up with the title “Create a new [Your chosen ad type] for this campaign” on which you'll create the copy for your ad, pair it with an image, and preview the different layout options.

Of course, there are a few guidelines around the copy that we suggest:

  • Ad image, which is the artwork or graphic that your audience will see for your ad. It must be 100x100 pixels and uploaded as a .jpg or .png file that is 2MB or smaller.
  • Ad headline, which is the main message your audience will see. It cannot be more than 25 characters.
  • Ad description, which is the body of your ad. It can be up to 75 characters long and should be relevant both to the person viewing the ad and the offer or page to which you're sending them.
  • Destination URL, which is where your audience will go when they click your ad. Double check that the URL is accurate.

Once you input this information, you’ll see it reflected in the Preview box to the right.

linkedin-advertising-campaigns-13

Once you click “Create,” you’ll be directed back to the previous Campaign Manager screen. From there, you can create more ads and, eventually, review and submit your order. Note: LinkedIn does review every submitted campaign order, so don’t expect to see your ads published right away.

To see the best results for your ads, consider creating a different ad for each of your buyer personas and tweak the copy accordingly. For example, when promoting a book to college professors, leading the title with the words "College Professor's Guide to …” may generate a higher CTR than generic, un-targeted headlines and copy.

Here are a few of our best copywriting tips for LinkedIn ads.

Call-to-Action (CTA)

Including an actionable CTA within your ad copy will also help you improve your ad's click-through rate (CTR). Consider asking people to "Download your e-book now," or "Click now for free samples" instead of writing copy that's devoid of actionable next steps.

Value

Incorporate your value proposition into your ad copy — this can make people more likely to click on your ad. By boasting something like "20% off your first purchase" or "Clearance sale ends today — Shop now," you're sending a clear signal of what someone will specifically gain when he or she clicks your ad.

Testing

Don't be afraid to test your ad copy. You can create multiple variations of your ad in each campaign, which allow you to test different images and copy within ads to find what works best for your audience.

How to Analyze Your LinkedIn Ad Campaign

Congratulations! You've officially launched your LinkedIn Ad campaign!

Now, for the best and debatably most important part of campaign marketing — analytics. LinkedIn makes it easy to track your progress in the Campaign Manager dashboard (under “Campaign Performance”), where you'll see various charts that measure performance like clicks, expenditures, and CTR. You can also keep track of conversions in the graphs toward the bottom of the dashboard.

linkedin-advertising-campaigns-14

When you finish setting up your first campaign, you'll see a lot of "0"s at first. Don’t worry, that's only because your campaign is new (and don’t forget that LinkedIn usually has to approve your ads before they go live).

LinkedIn Ads is now LIVE within all HubSpot Marketing Hub Professional and Enterprise accounts! Track visitor and contact engagement, run reports on closed-loop marketing, sync leads from LinkedIn lead generation forms, and MORE — all within your HubSpot account.

How to Optimize Your LinkedIn Ad Campaigns

Social ad campaigns can always be improved. Remember, your audience and content are always changing as well as the platform itself. Here are some ways to optimize your LinkedIn ad campaign.

Optimizing Under-Performing Campaigns

If your campaigns aren’t performing as well as you’d hope, here are a few measures you can take to optimize your campaigns. Tip: Set a reminder for yourself to check and optimize your campaigns each month.

Look at each campaign click-through rate.

Is one campaign out-performing the other(s)? If so, you may want to pause the less successful campaign(s). LinkedIn will automatically display less successful campaigns with lower frequency, so it makes sense to minimize any resources spent on them. Instead, putting more resources into successful ad variations and campaigns is more likely to accomplish your marketing goals.

Tweak one variable at a time.

Just because your ad is under-performing doesn’t mean you need to scrap the whole thing. Test different variations of the same ad to see what factor is contributing to or hindering its success. Edit the copy in your headline, change your feature image, tweak the target audience attributes, or update your bids — just don’t do these all at the same time or you won’t know which one is the fix.

Get — and stay — familiar with your audience.

Take a refresher on your target audience every month. Check out your buyer persona and conduct new research on the audience attributes that might need to be tweaked on your campaign. Update these attributes regularly so the very best people are always seeing — and hopefully engaging — with your ads.

Qualifying LinkedIn Ad Leads with Post-Click Reporting

Once your ads are running and people begin clicking on them, it's time to determine if they're actually driving qualified traffic to your website. That isn't something LinkedIn can tell you, so you’ll need to do some closed-loop reporting on these campaigns to get more details on the makeup of this traffic.

How can you figure that out? It's all about "gated" offers and forms — when someone clicks on your ad and lands on your website, “gating” the content you are offering with a lead form will help you collect data that qualifies that person as a good lead (or not). Connect that lead capture form to your customer relationship management (CRM) software, so that once the information is imported, your sales team can act upon them.

Need a CRM to capture, track, and nurture your leads … for free? Check out Hubspot’s CRM software. It’s 100% free, forever.

But don’t neglect your LinkedIn ad campaigns in favor of the landing page form data in your CRM. Is the traffic to your website generated by LinkedIn ads qualified? Is it generating customers? If not, you might need to further optimize your campaigns.

For example, if your LinkedIn ads are targeting people in companies with 1 to 10 people, but you find that the majority of your closed deals are from leads with companies with 100 to 200 — stop paying to target those smaller companies on LinkedIn.

The targeting options we covered above allow you to change any of your criteria, so use it to your advantage.

Ready to Try a New Ad Strategy?

With the right amount of patience and strategy, LinkedIn ad campaigns can be a huge factor in your company's marketing success. LinkedIn has a very powerful advertising platform; don’t leave this off your social campaign marketing list. A well-researched, optimized campaign has the potential to bring in thousands of new leads — and sales.

What has your experience been with LinkedIn Ads? Let us know in the comments.

Editor’s Note: This post was originally published in January 2013 and has been updated for accuracy and comprehensiveness.

free planner: how to run successful LinkedIn ads

http://bit.ly/2SZJ8Oa

What Are YouTube Tags & Why Are They Important?

YouTube is the second largest search engine in the world, so keyword-optimizing your videos on the platform is just as important as keyword-optimizing your blog posts for Google. Even if you’ve just created the next “Charlie bit my finger” video, you must remember that an algorithm dictates which videos YouTube will serve to its audience -- and which ones it won’t.

One of the best ways to keyword-optimize your videos for YouTube is leveraging tags. Below, we’ve put together a guide that will explain exactly what YouTube tags are, why they’re important, and some best practices to follow. We’ll also show you three YouTube tag generators that can help you discover the keywords that could rocket your videos to the top of the platform’s search results.

Why Are YouTube Tags Important?

YouTube tags are important because they help YouTube grasp your video’s content and context. This way, YouTube can understand your video’s topic and category, and associate it with similar content, which can amplify your video’s reach.

YouTube Tags Best Practices

To leverage YouTube tags to their fullest potential, check out these tips and tricks.

1. Make your first tag your target keyword and order the rest by importance.

YouTube heavily accounts for your video’s first few tags when ranking content in their search results, especially the first tag. So make sure your first tag is the exact keyword you want to target.

2. Use some broad keywords that describe the overarching topic your video falls under as other tags.

Using broad keywords as other tags helps YouTube understand your video’s context. For example, if you’re creating a video called “How to Hit a Baseball”, you’d want to add “Baseball” as a broad tag to indicate to YouTube that your video’s overarching topic is about baseball.

3. Use some specific keywords that describe the topics you covered in your video as other tags.

Using specific keywords that describe the topics you cover in your video as other tags helps YouTube understand your video’s content. For instance, in the same “How to Hit a Baseball” video, adding “hitting off a tee” or “hitting batting practice” as specific tags would indicate to YouTube the exact topics your video covers.

Best YouTube Tag Generators

To discover the keywords you can tag in your videos and help them rank higher in YouTube’s search results, here are three of the best YouTube Tag Generators to try.

1. Keyword Keg

Using Keyword Keg, you can enter your target keyword into the tool and it’ll serve up its search volume, cost-per-click, competition, on-page difficulty, off-page difficulty, SEO difficulty, CTR scope, keyword power, trends, and suggested keywords. You can also filter your results by country and language.

2. Keywordtool.io

After plugging your target keyword into its YouTube search bar, Keywordtool.io will provide you with suggested keywords, their search volume, how they’ve trended over the past 12 months, and questions, prepositions, and hashtags that also include your target keyword.

3. VidIQ

VidIQ will display your target keyword’s related keywords, related score, search volume, search score, competition score, and overall score, which is a combination of a keyword’s related score, search score, and competition score.

http://bit.ly/2tGenyX

8 Costly Facebook Ad Mistakes and How to Avoid Them

Are you making Facebook ad mistakes that could be eating away at your marketing budget? Are your ads helping Facebook more than they’re helping your business? In this article, you’ll discover the most common mistakes made with Facebook ads and how to resolve them from top Facebook advertising experts. #1: Testing Multiple Interests in a […]

The post 8 Costly Facebook Ad Mistakes and How to Avoid Them appeared first on Social Media Marketing | Social Media Examiner.

February 27, 2019 at 12:00PM http://bit.ly/2H2wXcg
read more...
from Social Media Marketing | Social Media Examiner http://bit.ly/2tEqegC
via IFTTT

Tuesday, February 26, 2019

YouTube SEO: How to Optimize Videos for YouTube Search in 2019

As recently as a decade ago, inbound marketing was a brand new idea. Marketers were learning that they couldn't just publish a high volume of content -- it also had to be high-quality and optimized in ways that made it as discoverable as possible through search engines.

That content was once largely limited to the written word. Today, that's no longer the case.

Today, a comprehensive content strategy includes written work like blogs and ebooks, as well as media like podcasts, visual assets, and videos.

That last part -- video -- continues to be on the rise. According to the 2018 State of Inbound report, 45% of marketers are investing more in YouTube over the course of this year -- more than any other marketing channel available to them.Unlock the one resource you need to start growing your YouTube business channel.

And with the rise of other content formats comes the need to optimize them for search. One increasingly important place to do that is on YouTube, a video distribution website used by the masses -- HubSpot included.

But how does YouTube SEO work? What are the steps you need to take to optimize your YouTube channel for search? We've outlined some major tips and tools below.

1. Rename your video file using a target keyword.

Just like you would when optimizing written content, you'll use an SEO tool to first identify keywords you'd like your video to focus on (you can browse popular YouTube SEO tools below these tips, or just click that link earlier in this sentence).

With a keyword identified, the first place you should put it is your video file -- before you even upload it to YouTube. Why? YouTube can't actually "watch" your video to see how relevant it is to your target keyword, and as you'll learn in the tips below, there are only so many places you can safely insert this keyword on your video's viewing page once it's published. But, YouTube can read your video's file name and all the code that comes with it when it's uploaded.

With that in mind, replace the "business_ad_003FINAL.mov" file name (don't be embarrassed ... we've all been there during post-production) with your desired keyword. If your keyword is "house painting tips," for example, your video's file name should be "house-painting-tips" followed by your preferred video file type (MOV, MP4, and WMV are some of the most common that are compatible with YouTube).

2. Insert your keyword first in the video title.

When we search for videos, one of the first things that our eyes are drawn to is the title. That's often what determines whether or not the viewer will click to watch your video, so the title should not only be compelling, but also clear and concise.

Although your keyword plays a big part in your video title, it also helps if the title closely matches what the viewer is searching for. Research conducted by Backlinko found that videos with an exact keyword match in the title have a slight advantage over those that don’t. Here's a linear representation of those findings:

exact-match-title.png Source: Backlinko

So, while "using your target keyword in your title may help you rank for that term," report author Brian Dean explains, "the relationship between keyword-rich video titles and rankings" isn't always a strong one.

Lastly, make sure to keep your title fairly short -- HubSpot campaigns manager Alicia Collins recommends limiting it to 60 characters to help keep it from getting cut off in results pages.

3. Optimize your video description.

First things first: According to Google, the official character limit for YouTube video descriptions is 1,000 characters. And while it's okay to use all of that space, remember that your viewer most likely came here to watch a video, not to read an essay.

If you do choose to write a longer description, keep in mind that YouTube only displays the first two or three lines of text -- that amounts to about 100 characters. After that point, viewers have to click "show more" to see the full description. That's why we suggest front-loading the description with the most important information, like CTAs or crucial links.

As for optimizing the video itself, it doesn't hurt to add a transcript of the video, especially for those who have to watch it without volume. That said, Backlinko's research also found no correlation between descriptions that were optimized for a certain keyword and the rankings for that term.

keyword-in-description.png Source: Backlinko

Dean is careful not to encourage ditching an optimized description altogether, though. "An optimized description helps you show up in the suggested videos sidebar," he writes, "which is a significant source of views for most channels."

4. Tag your video with popular keywords that relate to your topic.

YouTube's official Creator Academy suggests using tags to let viewers know what your video is about. But you're not just informing your viewers -- you're also informing YouTube itself. Dean explains that the platform uses tags "to understand the content and context of your video."

That way, YouTube figures out how to associate your video with similar videos, which can broaden your content's reach. But choose your tags wisely. Don't use an irrelevant tag because you think it'll get you more views -- in fact, Google might penalize you for that. And similar to your description, lead with the most important keywords, including a good mix of those that are common and more long-tail (as in, those that answer a question like "how do I?").

5. Categorize your video.

Once you upload a video, you can categorize it under "Advanced settings." Choosing a category is another way to group your video with similar content on YouTube so it winds up in different playlists and gains exposure to more viewers who identify with your audience.

It might not be as simple as it looks. In fact, YouTube's Creator Academy suggests marketers go through a comprehensive process to determine which category each video belongs in. It's helpful, the guide writes, "to think about what is working well for each category" you're considering by answering questions like:

  • Who are the top creators within the category? What are they known for and what do they do well?
  • Are there any patterns between the audiences of similar channels within a given category?
  • Do the videos within a similar category have share qualities like production value, length, or format?

6. Upload a custom thumbnail image for your video's result link.

Your video thumbnail is the main image viewers see when scrolling through a list of video results. Along with the video's title, that thumbnail sends a signal to the viewer about the video's content, so it can impact the number of clicks and views your video receives.

While you can always pick one of the thumbnail options auto-generated by YouTube, we highly recommend uploading a custom thumbnail. The Creator Academy reports that "90% of the best performing videos on YouTube have custom thumbnails," recommending the use of images that are 1280x720 pixels -- representing a 16:9 ratio -- that are saved as 2MB or smaller .jpg, .gif, .bmp, or .png files. If you follow those parameters, it can help to ensure that your thumbnail appears with equally high quality across multiple viewing platforms.

It's important to note that your YouTube account has to be verified in order to upload a custom thumbnail image. To do that, visit youtube.com/verify and follow the instructions listed there.

7. Use an SRT File to add subtitles & closed captions.

Like much of the other text we've discussed here, subtitles and closed captions can boost YouTube search optimization by highlighting important keywords.

In order to add subtitles or closed captions to your video, you'll have to upload a supported text transcript or timed subtitles file. For the former, you can also directly enter transcript text for a video so that it auto-syncs with the video.

Adding subtitles follows a similar process, however, you can limit the amount of text you want displayed. For either, head to your video manager then click on "Videos" under "Video Manager." Find the video you want to add subtitles or closed captioning to, and click the drop-down arrow next to the edit button. Then, choose "Subtitles/CC." You can then select how you’d like to add subtitles or closed captioning.

Find out how to add closed captions to your YouTube video in the video below.

8. Add Cards and End Screens to increase your YouTube channel's viewership.

Cards

When you're watching a video, have you ever seen a small white, circular icon with an "i" in the center appear in the corner, or a translucent bar of text asking you to subscribe? Those are Cards, which Creator Academy describes as "preformatted notifications that appear on desktop and mobile which you can set up to promote your brand and other videos on your channel."

"i" icon to create End Cards in YouTube video Source: Google

You can add up to five cards to a single video, and there are six types:

  1. Channel cards that direct viewers to another channel.
  2. Donation cards to encourage fundraising on behalf of U.S. nonprofit organizations.
  3. Fan funding to ask your viewers to help support the creation of your video content.
  4. Link cards, which direct viewers to an external site, approved crowdfunding platform, or an approved merchandise selling platform.
  5. Poll cards, which pose a question to viewers and allow them to vote for a response.
  6. Video or playlist cards, which link to other YouTube content of this kind.

For detailed steps on adding a card to your video, follow these official steps from Google, or check out the video below.

End Screens

End screens display similar information as cards, but as you may have guessed, they don't display until a video is over, and are a bit more visually detailed in nature. A good example is the overlay with a book image and a visual link to view more on the video below:

End screens displayed on a YouTube video Source: Jamie Oliver on YouTube

There are a number of detailed instructions for adding end screens depending on what kind of platform you want to design them for, as well as different types of content allowed for them by YouTube. Google outlines the details for how to optimize for all of those considerations here.

It's important to note that YouTube is always testing end screens to try to optimize the viewer experience, so there are times when "your end screen, as designated by you, may not appear." Take these factors into account as you decide between using either cards or end screens.

These factors may seem a bit complicated and time-consuming, but remember: The time people spend watching YouTube on their TV has more than doubled year over year. There's an audience to be discovered there, and when you optimize for YouTube, your chances of being discovered increase.

Now, most of the SEO tips above rely on you identifying a keyword and promoting your video correctly. And not all of those tips can be carried out through YouTube alone. To get the most bang for your videography buck, consider some of the tools below to optimize your video for search.

1. Ahrefs Keywords Explorer

ahrefs-keyword-explorer-youtube

Ahrefs is a comprehensive SEO platform that allows you to monitor a website's ranking, estimate the organic traffic you'd get from each keyword, and research keywords for which you might want to create new content.

One popular feature of Ahrefs is Keywords Explorer, which allows you to look up numerous details related to a keyword you're interested in. And as you can see in the screenshot above, you can filter your keyword results by search engine -- including YouTube.

Ahrefs Keywords Explorer gives you a keyword's monthly search volume, how many clicks received by videos ranking for that keyword, related keywords, and more.

2. Canva

canva-youtube-thumbnail-designer

You might know Canva as a design template for creating all kinds of cards, photos, logos, and more. It just so happens this popular product has a Thumbnail Creator just for YouTube videos.

As stated in the tips above, thumbnail images are critical to promoting your content in YouTube search results and enticing users to click on your video. Using Canva's Thumbnail Creator, you can create the perfect preview image for your video in 1280 x 720 pixels -- the thumbnail dimensions YouTube requires.

3. HubSpot Content Strategy

hubspot-content-strategy-tool
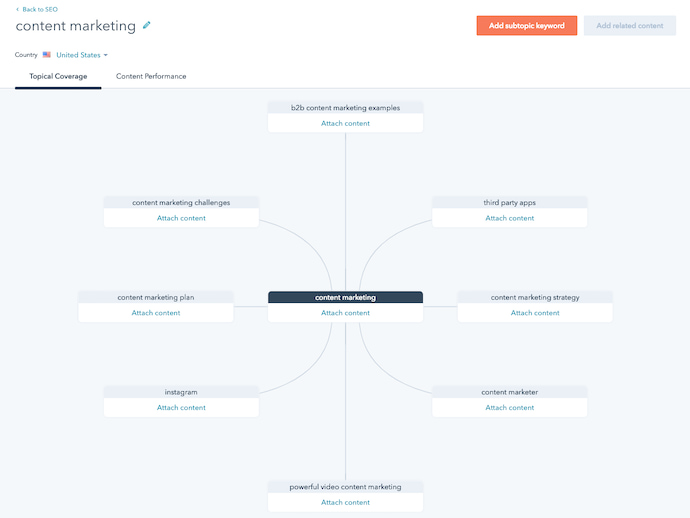
Our content strategy tool, developed here at HubSpot, allows you to find popular keywords for which to create content and then organize these keywords into groupings -- what we call "topic clusters." By sorting your content into topic clusters, you can oversee which pieces of content are related to one another, which types of content you have planned, and what you've already created.

While the keywords you discover in HubSpot reflect their popularity in a standard Google search, many of these topics will also produce videos on Google's search engine results pages. In those cases, you can create topic clusters that have both blog and YouTube content belonging to them.

Clustering your content -- and linking from videos to blog posts, and vice-versa -- can give you more authority in the eyes of Google and YouTube, while giving you more ways to capture traffic from the people searching your topic.

4. vidIQ Vision

vidiq-vision-for-youtube
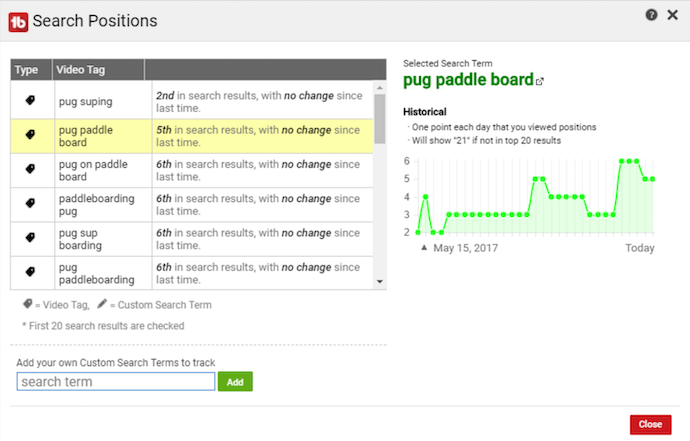
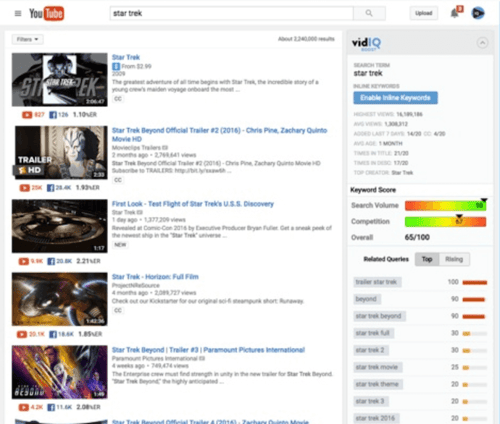
This is a Chrome extension, available through Chrome's web store in the link above, that helps you analyze how and why certain YouTube videos perform so well. This includes the tags a video has been optimized for, its average watch time, and even how quickly that video might be gaining traffic.
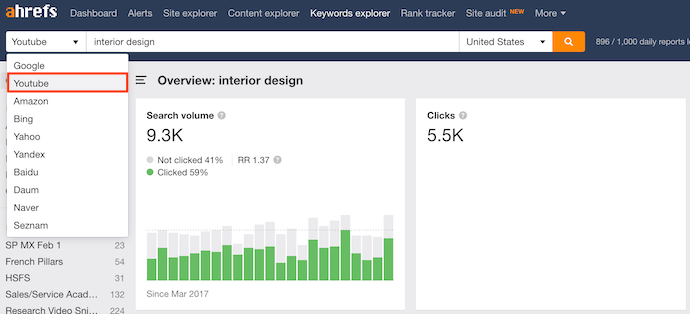
The vidIQ tool then provides an SEO "score" you can use to create content that performs (or outperforms) the results you already see on YouTube.

5. TubeBuddy

tubebuddy-youtube-seo-tool

TubeBuddy is an all-in-one video platform that helps you manage the production, optimization, and promotion of your YouTube content. Its features include an automatic language translator (which helps you rank for non-English keywords), a keyword explorer, tag suggestions, a rank tracker for your published videos, and more.

6. Cyfe

cyfe-web-analytics-tool

Cyfe is a large software suite that offers, among other things, a web analytics platform. On this platform, you can track page performance across every website property you have content on -- including YouTube -- and where each page's traffic is coming from.

In addition to traffic analytics, Cyfe can show you which keywords you're ranking for and which ones are most popular across various search engines. Sounds a lot like Google Analytics or Moz, right? That's because Cyfe has data from both of those tools, and more, built into it.

No matter what SEO tip or tool you start with, a successful YouTube channel begins with good content. Make sure your viewers have something high-quality and relevant to watch when they find you. Want step-by-step help? Download our free guide on YouTube for Business below.

YouTube for Business

YouTube for Business
http://bit.ly/2CpfANM

The Ultimate Guide to G Suite

As both an employee and small business owner, I adore G Suite. I’d consider it one of the best tools I have at my disposal, mainly because it’s so easy to use and incredibly multi-functional.

Whether I’m collaborating with my editor on a new HubSpot blog piece, scheduling time to chat with a new client, or emailing my friends a funny dog GIF, G Suite comes in handy for almost anything you’re doing on your computer — productive or otherwise.

Google entered 2019 with 5 million paying G Suite customers — a number that’s increased by 25% since the beginning of 2017. I’ll let that statistic speak for itself: G Suite is a highly valuable tool for individuals and businesses worldwide. Notable G Suite customers include Uber, BuzzFeed, PwC, and, of course, HubSpot.

If you haven’t tapped into the G Suite platform for your business, we encourage you to check it out. Read through this guide to better understand the G Suite platform, how you can optimize your account, and how you can use the tool to grow better. Better yet, bookmark this so you can reference it later.

G Suite was released 12 years ago as “Google Apps for Your Domain”. The initial launch included Gmail, Google Talk, Google Calendar, and Google Page Creator (now known as Sites). Google Apps for Education followed two months later.

Over the last 10 years, Google released various tools and updates as part of its application suite. Google Apps was rebranded to G Suite in September of 2016, and not long after, the company launched its first hardware product: Jamboard.

The G Suite platform also includes the G Suite Marketplace (which was originally released in 2010), through which you can install third-party cloud applications to use as part of your collection of G Suite tools.

Who uses G Suite?

Both businesses and individuals use G Suite.

Consumer accounts aren’t necessarily called “G Suite,” though. For example, when I’m signed into my personal Google account, the top right corner of the screen looks like this:

guide-to-g-suite

Alternatively, when I’m signed into my personal business Google account, the top right corner reflects this:

guide-to-g-suite

While G Suite services are free for consumers, businesses have to pay for enterprise features such as a custom email domain, unlimited cloud storage, additional administrative and marketing tools, and 24/7 support. (We’ll get into the G Suite pricing structure later.)

If businesses have multiple users on their G Suite, they also have to pay per person. Here’s what Google looks like when I’m signed into my HubSpot employee account:

guide-to-g-suite

Unlike other free consumer software, though, free G Suite users don’t see ads while using the services. Bonus: Google doesn’t use the information stored in G Suite applications and accounts for advertisement purposes.

guide-to-g-suite

The G Suite Products

Google offers a wide variety of products for both personal and enterprise use. Most are accessible with a Google account (by tapping the menu in the top right corner), though some need to be installed as Google Chrome extensions to gain full functionality.

guide-to-g-suite

Later, we’ll walk through how to set up and manage your G Suite account, but for now, let’s review the different tools available in your G Suite.

Gmail

Gmail is the G Suite email software. It was released in 2004 and now has over 1 billion users worldwide.

With a G Suite plan, businesses enjoy 30GB of storage space, custom company email addresses (yourname@company.com), unlimited Google Group email addresses, 24/7 phone and email support, and compatible add-ons available through the G Suite Marketplace.

Know the second a lead opens an email, send a perfectly timed follow-up, and close deals faster than ever with HubSpot’s Email Tracking — compatible with Gmail.

Drive

Google Drive is the G Suite cloud storage platform and was launched in 2012. Drive manages all of your company’s content and supports collaboration across your entire organization. It also allows you to view various file formats so you don’t have to download additional software to your devices.

Depending on the G Suite plan, businesses enjoy 30GB, 1TB, or unlimited storage per user and audit and reporting insights for Drive content.

Docs, Sheets, and Slides

Google Docs, Google Sheets, and Google Slides are the G Suite word processor, spreadsheet, and presentation programs, respectively. They were added to the platform in 2006.

These programs allow real-time collaboration, save changes automatically, and track revision history. Users can insert comments, suggest edits, communicate through a built-in chat, and create templates for future use.

With a G Suite plan, businesses enjoy unlimited revision history among other perks.

Forms

Google Forms is the G Suite web form and survey tool. Also launched in 2006, Forms shares many of the same features as Docs, Sheets, and Slides, such as automatic saving, real-time collaboration, and template creation. To collect data through Forms, users can personalize surveys or quizzes, send respondents the URL, and review the data (that’s automatically collected in Sheets).

Download HubSpot’s Free Online Form Builder to convert your visitors into leads and start growing your business faster.

Calendar

Google Calendar is the G Suite online calendar. It was launched in 2006 and integrates with Gmail to manage schedules, appointments, meetings, and tasks (via Google Tasks).

With a G Suite plan, businesses enjoy smart scheduling (where employees can see open windows of time on coworkers’ calendars), calendars for Google Groups, calendars for meeting rooms and shared resources, public calendars so customers can view company events, and easy migration from external calendars (e.g. iCal, Outlook, or Exchange).

Google+

Google+ is the G Suite social network. It was launched in 2011, and as of October 2018, Google is planning to sunset Google+ for consumers in April 2019.

But, with a G Suite plan, businesses can still enjoy the service as well as restricted communities and enhanced privacy controls.

Sites

Google Sites is the G Suite website builder. It was added to the platform in 2008 and allows users to create websites with little to no coding knowledge or design skills. Landing page and project websites can be created using pre-made templates and published internally or publicly.

Hangouts

Google Hangouts is the G Suite communication and messaging tool. Originally launched in 2006 as Google Talk, Hangouts supports text, voice and video conversations (for up to 25 participants) and can be used between desktop and mobile devices. It’s also a common alternative to Slack.

With a G Suite plan, businesses enjoy a seamless integration with Calendar, screen sharing for participants, auto focus and intelligent muting features, public livestreams automatically saved in YouTube, and custom administrative controls.

Keep

Google Keep is the G Suite note-taking tool. The newest addition to the G Suite platform, Keep can be used to create, organize, and share memos, lists, images and voice notes across multiple devices. It’s available as a Chrome download and mobile application.

With a G Suite plan, businesses enjoy a seamless integration with Google Docs among other perks.

Need more hours in the day? Download our complete workplace productivity guide here.

G Suite for Business

There’s no doubt G Suite is a valuable tool for businesses of all sizes. It’s the digital equivalent of a pocket knife — it supports collaboration, organization, productivity, marketing, and sales.

Do you think G Suite would be a great addition to your company? Follow along this section as we discuss how to set up G Suite for business.

G Suite Pricing

Over the last ten years, G Suite has grown and expanded tremendously … without changing their prices. (How crazy is that?)

Since day one, Google has offered two G Suite business offerings: the G Suite Basic Edition (at $5 per user per month) and the G Suite Business Edition (at $10 per user per month). Read more about the G Suite Editions here.

On January 16, 2019, Google announced that, for the first time in a decade, they’d be raising the prices of G Suite (albeit by a fraction). Starting on April 2, the Basic Edition will increase to $6 per user per month, and the Business Edition will increase to $12 per user per month. Pricing for G Suite Enterprise Edition customers won’t change.

Despite the incremental increase, G Suite is still a fantastic investment for your business. The per-user pricing model presents a cost that’s proportionate to each business, regardless of size. Also, with the G Suite Flexible Plan, businesses can pay monthly and avoid long-term commitment.

Setting Up Your G Suite Account

Creating a G Suite account is simple. Head to the G Suite homepage and click “Get Started.”

Enter your company name and indicate how many employees you have. You can always change this number as your team grows.

Next, enter your contact information (or the information for whoever will be managing the G Suite account). Google will send a confirmation to the email address you insert here, so be sure it’s accessible.

guide-to-g-suite

The next screen will ask if you have a business domain name. If you already have one, insert it here. If you don’t, Google will help you find and purchase one — most domains are $12/per year if purchased through Google.

guide-to-g-suite

Enter your business address and contact information on the next screen.

Finally, choose a username and password for your G Suite account. You’ll use these credentials to sign into any G Suite tools in the future. Note: Your username will also be the first part (or local-part) of your business email.

guide-to-g-suite

To complete your account set up, you’ll be asked to review your account and check out. On this screen, you’ll see a summary of your monthly charges (after your 14-day trial) and any other one-time charges, such as a domain name. You’ll also be asked to review your account information and enter your payment method.

guide-to-g-suite

Lastly, you’ll see two choices to automatically renew your domain and keep your domain information private — we encourage you to keep those checked to simplify the domain purchase process.

Managing Your G Suite Account

Once you create your G Suite account, you’ll be directed to your G Suite Admin panel. This is arguably the most important part of your G Suite account — you’ll manage all of your settings from this page.

guide-to-g-suite

Let’s break down the sections and what you can do within each.

Users

This is where you add new users to your G Suite account. You can also manage your users and assign them various attributes, like Job Title and Department, as well as track their Last sign in and Email usage.

Company profile

This is where you update information about your company and personalize your G Suite account with your company logo. You can also create custom URLs to your various G Suite services for your users.

guide-to-g-suite

Billing

This is where you view your account charges and manage your G Suite license(s). You should see whichever Edition (plan) you chose for your business reflected here.

guide-to-g-suite

Reports

This is where you track the usage of your G Suite services and apps as well as user activity. Under Highlights, you’ll see an overview of usage activity per app, user status, storage statistics, and security. Under Reports, you’ll see options to run reports on specific services, devices, and users. You can also run audits to see what users are accessing what services and tools.

Apps

This is where you manage your G Suite services and their settings. Here, you’ll see how many G Suite core apps you’re using, what additional Google services you’re using, and any Marketplace or Security Assertion Markup Language (SAML) services you’ve connected to your account.

guide-to-g-suite

Device management

This is where you secure your company data on all devices connected to your G Suite account. You’ll see how many mobile and Chrome devices are connected as well as how many Google devices (like Jamboard) are linked to your account. There’s also a handy screen on which you can manage all your company-owned devices.

guide-to-g-suite

Security

This is where you manage all security features for your G Suite account. From password management and monitoring to setting up single sign-on (SSO), this page equips you to keep your G Suite account and users secure.

Support

This is where you access G Suite support, which is available 24/7 over phone or email. Before being directed to a live support line, though, you’ll be shown a Help for Admins pop-up box with recommended help content.

Data migration

This is where you import your company email, calendar, and contact data. Google makes it easy to bring over any company data you need to successfully organize and use your G Suite. You’ll need to run this tool for each type of data you migrate. To run a migration, you’ll need the migration source, connection protocol, and the credentials of an account to verify that you own the data.

guide-to-g-suite

Dashboard

This is where you see relevant insights about any business domains connected to your G Suite account.

Buildings and resources

This is where you manage and monitors any buildings, rooms, and company resources connected to your G Suite account. Here, you’ll plug in any meeting and conference rooms that you want to be available for your users to schedule on their Calendar. You can also access insights that tell you how and when your rooms are being used.

Groups

This is where you create groups and mailing lists. Groups are handy for communicating with entire teams or parts of your organization at once. You can also give each group its own calendar for scheduling events and managing team meetings.

guide-to-g-suite

Admin roles

This is where you add new admins and manage current admin roles and permissions for your G Suite account. You can also set admin permissions for specific groups, services, and devices. You’ll see what admins have what permissions, and you can change those accordingly.

Domains

This is where you can add or remove domains associated with your G Suite account. You can add a new domain or domain alias on this page, as long as you can verify ownership. You can also manage where your visitors are redirected when they visit your domain.

guide-to-g-suite

Note: I used my personal business G Suite account to pull example images for this section. You’ll see that there’s only one user on my account (me 🙋🏻‍♀️) … your account and admin panel will likely look much different if you have multiple users, groups, admins, and domains.

Six Ways to Use G Suite to Grow Better

G Suite is a valuable platform for your company. But how can you use it to grow your business better? Below, we cover seven specific strategies for making the most of your G Suite account.

Check out the G Suite + HubSpot integration today and see how it can benefit your business growth.

1. Create On-Brand Templates with Drive

Brand identity is crucial, and the cost of branding and logo design can be costly. Who wants to see their marketing dollars go to waste (i.e. see employees using off-brand documents, presentations, and graphics)? I sure wouldn’t.

Use your G Suite services to simplify the process of staying on-brand. Google Docs, Sheets, Slides, and Forms all have template capabilities — have a designer create on-brand design templates and save them to your Drive. Then, encourage your employees to use these templates instead of starting from scratch.

2. Collect Customer Feedback with Forms

Customer feedback is the lifeblood of a healthy, growing business. If you don’t know what you’re doing right, you can’t do more of it. If your don’t know what you’re doing wrong, you can’t fix it. Customer feedback should be a high priority for your company.

Google Forms makes it easy to gather and analyze data from customers and clients. Use the tool to create simple surveys that collect customer feedback, market research, your Net Promoter Score®, and more. You can also use Forms to conduct internal research or gather information from peers and coworkers.

3. Empower Remote Employees with Calendar

Take it from me — as awesome as remote work can be, there’s something to be said about working alongside your team every day. For one, it can be easier to collaborate if you see each other in person. But that’s not always possible for those who work remotely or internationally.

If you have remote employees, Google Calendar can help them feel connected and included in what’s going on at work. Calendar makes it easy to see coworkers’ schedules and book time in an open room by their desk — without ever having to step foot in the office. You can also set up dedicated calendars for company-wide events or extracurriculars like the gym or after-work book clubs. Employees can simply subscribe to those calendars to stay up-to-date.

4. Manage Team Tasks with Keep

The internet keeps us connected, but it can still be hard to collaborate remotely. If you’ve ever wanted a place to digitally jot notes, make lists, draw sketches, and save images, all while working in tandem with multiple people, Keep is the solution for you. Keep is a common Evernote alternative that’s super helpful even if you’re not using G Suite.

Use Keep to manage team tasks, outstanding projects, and ongoing collaborations. Create checklists to stay on top of assignments, and link a Collaborator so they can see what’s due. You can also save articles and websites to your Keep folder and add notes with important thoughts and ideas — making online research even easier.

5. See How Employees are Using G Suite with Reports

Not everyone uses G Suite equally. The Reports panel on your Admin Console can tell you how and how often your team is using the G Suite tools and apps. Use this insight to better educate your team on what G Suite has to offer. Also, the Reports panel can provide valuable security information — like what devices have been used to login and which users might need to install updates — so you can keep your team and data safe and secure.

6. Leverage New Tools on the G Suite Marketplace

The G Suite Marketplace is one of my favorite places to shop. Google has integrated literally hundreds of third-party tools that only serve to make your and your employees lives easier. Choose from tools for business, productivity, communication, education, and utility. Download apps like Zoom, Xero, Google Analytics, and Asana to link seamlessly to your G Suite account and integrate with other apps like Sheets, Calendar, and more.

Tip: Keep an eye on how your employees are using any new tools to see if they’re benefiting your business or not.

Check out and install the HubSpot app on G Suite Marketplace today.

Take Your Business to the Next Level with G Suite

For the last decade, G Suite has been helping businesses collaborate, communicate, and grow. Through simple tools and an even simpler on-boarding process, G Suite has become an indispensable tool for companies worldwide. Regardless of what industry you’re in, G Suite can only serve to help you improve your business processes, inside and out.

G Suite equips your employees to complete hundreds of tasks with ease — productive or otherwise. 😉

http://bit.ly/2GZIn0u